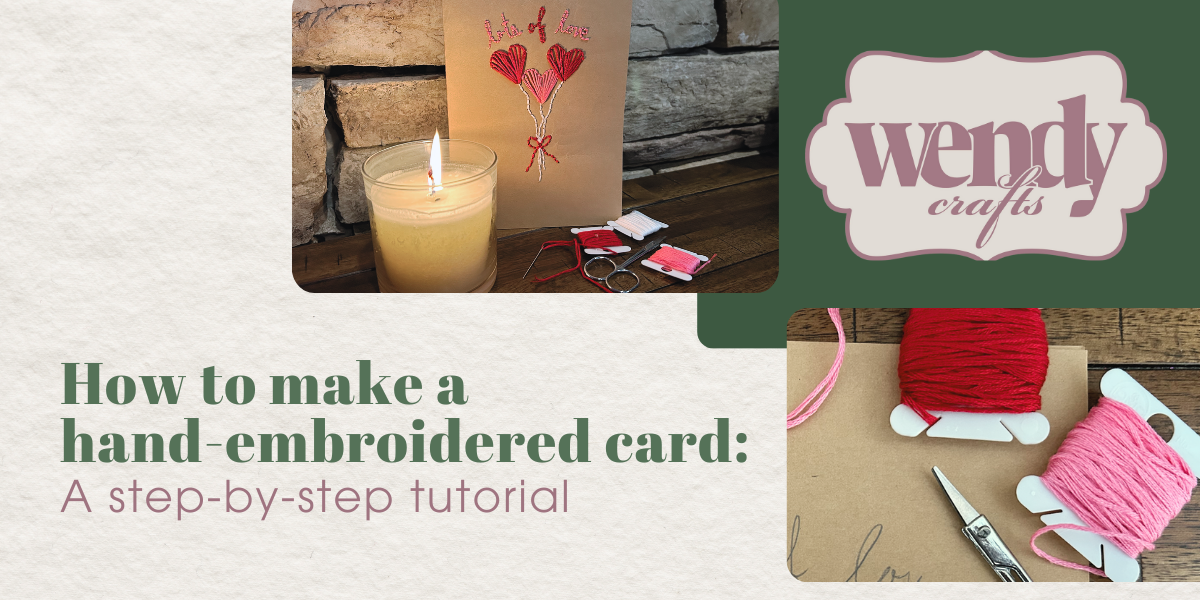
There’s something special about knowing someone took the time to create something just for you! Hand-embroidered cards offer a personal touch and sentimental value missing from most store-bought cards. Whether you’re a complete beginner or have embroidery experience, you can make embroidered cards people will love receiving.
At Wendy Crafts, I’m passionate about helping you explore your creativity and discover the joy of handmade crafts. Adding a touch of hand embroidery to a card creates a unique and heartfelt gift that’s sure to be treasured.
Let’s get crafting!
Materials Needed
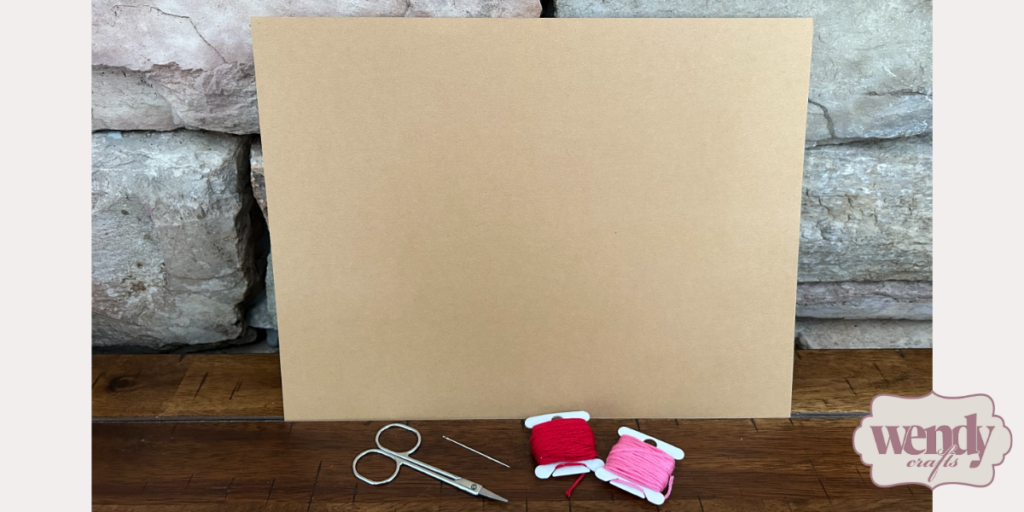
Before you get to the actual card-making, you’ll need to gather basic tools and materials for making beautiful hand-embroidered cards.
- Embroidery Floss/String: This is your paint! DMC and Anchor are popular brands that offer an extensive range of colors in various types, such as cotton, silk, and metallic. Each type has a unique texture and sheen, so feel free to experiment and find your favorites.
- Embroidery Needles: Select needles with a sharp point for easily piercing card stock. Sizes 7 and 9 are commonly used for embroidery, but you can adjust depending on your thread and fabric.
- Card Stock or Blank Greeting Cards: Choose sturdy card stock to prevent warping or tearing. For added interest, consider textured options like linen or felt, or use pre-folded cards for convenience.
- Scissors: Sharp embroidery scissors are ideal for snipping threads cleanly and preventing fraying.
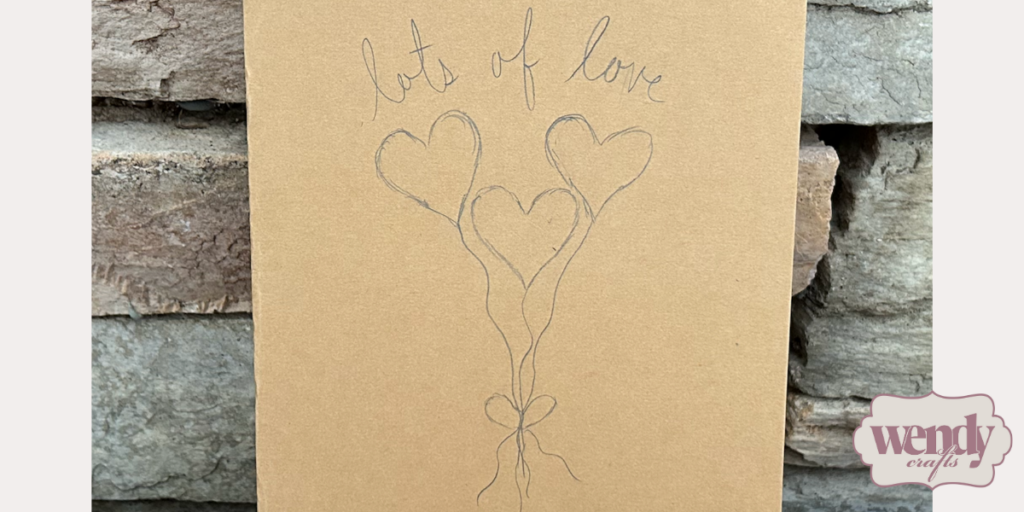
- Pencil or Water-Soluble Pen: Use these to trace your design lightly before inserting your embroidery needle and string.
- Optional Tools & Materials: Tracing paper, a ruler, a lightbox, and embellishments (beads, sequins, etc.) to add sparkle and dimension to your cards.
The items on this list can be found at local craft stores, such as Michaels and Joann Fabrics, online retailers like Amazon and Etsy, or specialty embroidery shops.
Choosing Your Design for Embroidered Cards
The beauty of hand-embroidered cards lies in the endless design possibilities. From birthdays to Valentine’s Day to “just because,” you can’t go wrong with a handmade card!
Here are some ideas to inspire your embroidered card project:
- Simple Patterns for Beginners: Start with simple and charming designs, such as hearts, flowers, stars, and basic lettering, which are easy to master and build confidence.
- Intricate Designs for Experienced Embroiderers: Explore more complex floral patterns, animals, or miniature scenic landscapes—challenge yourself with intricate stitches and thread combinations.
- Pre-made Hand Embroidered Card Patterns: Many online shops and craft stores offer ready-to-use patterns to save time and provide a starting point for your creations.
- Create Your Own: Sketch your ideas, draw inspiration from nature, or use online tools to create custom patterns.
- Online Inspiration: Pinterest, Etsy, and Instagram are treasure troves of embroidered card ideas. Browse through different styles, color palettes, and techniques to spark your creativity.
Remember to choose a design based on the occasion and the recipient’s personality. A bright and whimsical design is great for a birthday card, while a simple, elegant pattern is ideal for a wedding or anniversary card.
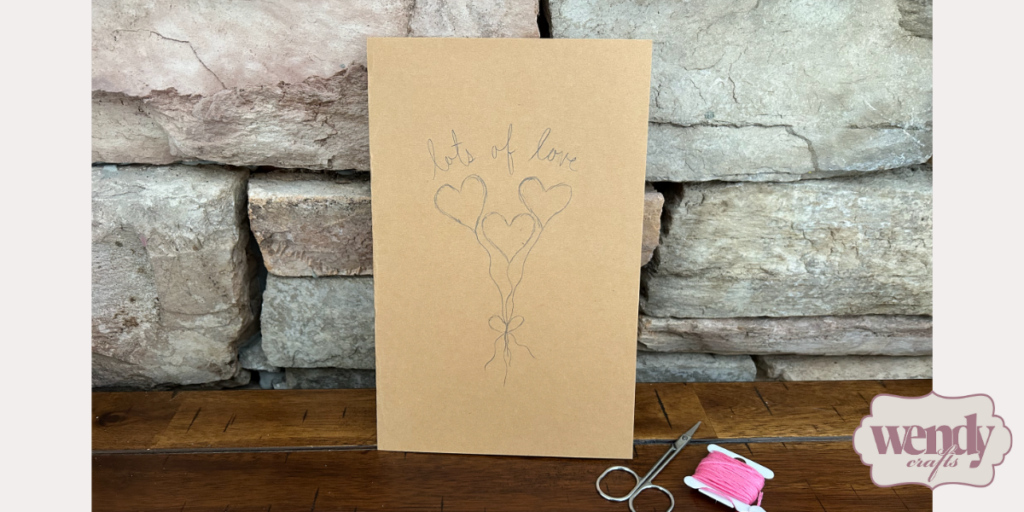
Preparing Your Card for Embroidery
Once you have your materials and design image, it’s time to prepare your card for embroidery. There are a couple of easy ways to put the design image on your card.
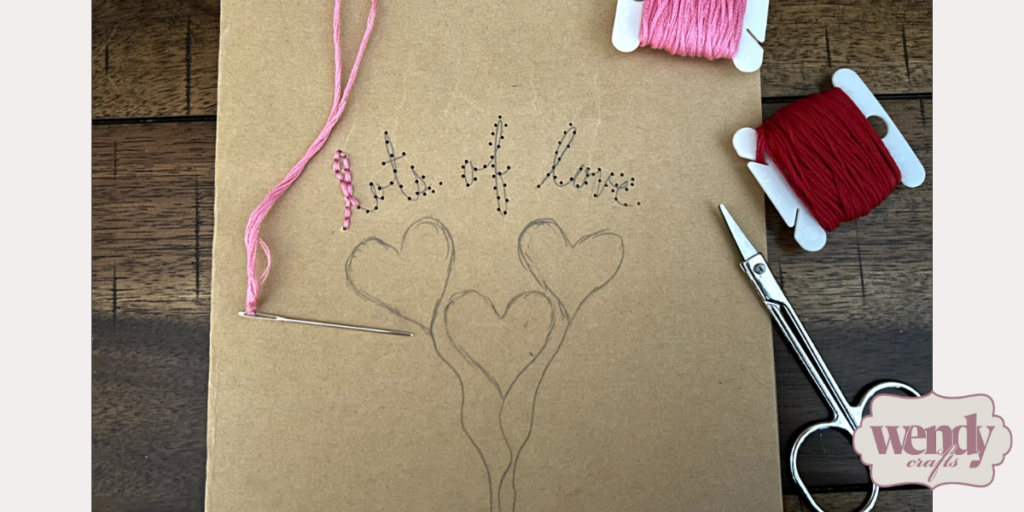
If you have a steady hand and are making a simple design, you can lightly trace the design directly onto the card using a pencil or water-soluble pen.
If you prefer a cleaner transfer or the design is intricate, trace the pattern onto tracing paper. Then, use a lightbox to illuminate the design from below. This will allow you to see the lines through the card stock and trace them accurately.
If you have a printer that can handle card stock, you can print your design directly onto the card. Check that your printer settings are adjusted for thicker paper to avoid jams or smudging!
Tips for Placing Your Design:
- If you’re using a water-soluble pen, test it on a scrap piece of paper first to make sure the ink comes off cleanly.
- Center your design carefully using a ruler as a guide.
- Use light pressure when tracing to avoid leaving deep indentations on the card.
Basic Embroidery Stitches for Cards
Don’t worry if you don’t know how to do fancy embroidery—even simple stitches can make your handmade cards shine! I’ll show you a few easy ones that are perfect for adding a touch of handmade love to your cards.
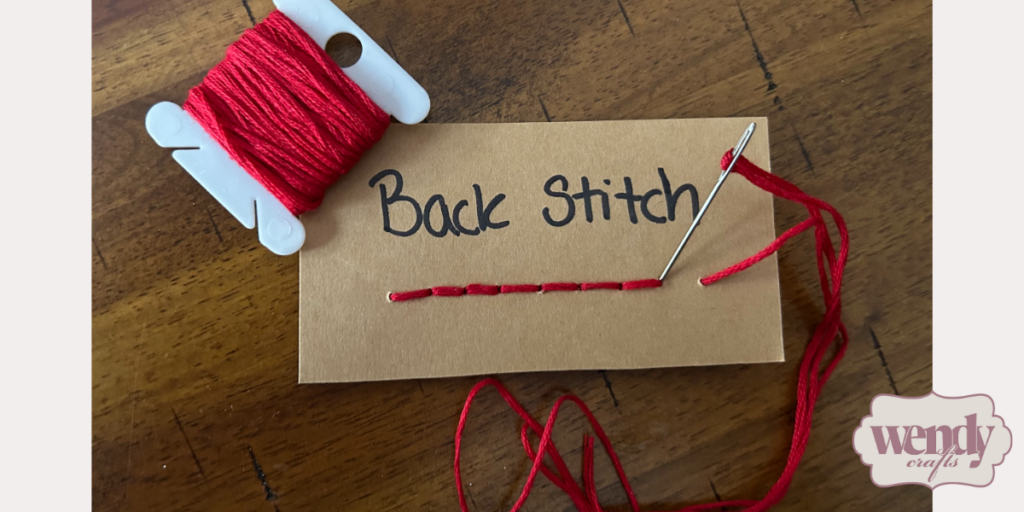
Backstitch
This versatile stitch creates a solid line, ideal for outlines, lettering, and stems. To backstitch, do the following:
- Bring the needle up through the card at your starting point (point A).
- Take a small stitch backward (point B), inserting the needle back down.
- Then, you’ll bring the needle up a stitch length ahead (point C).
- Insert the needle back down at point B and bring it up a stitch length ahead of C (point D).
- Continue the same stitching process to create a continuous line on your card.
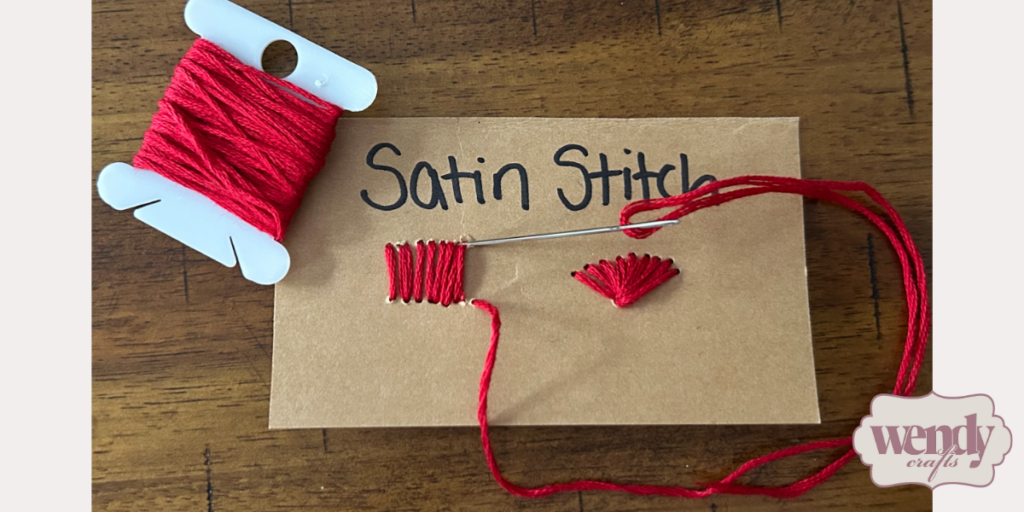
Satin Stitch
Use this stitch to fill areas with solid color, creating a smooth, satin-like finish. To use the satin stitch in your design, follow these simple steps:
- Bring the needle up on one side of the shape (point A) and down on the other (point B).
- Keep the stitches close together and parallel.
- Repeat this process, ensuring the threads lie flat and smooth for a polished look.
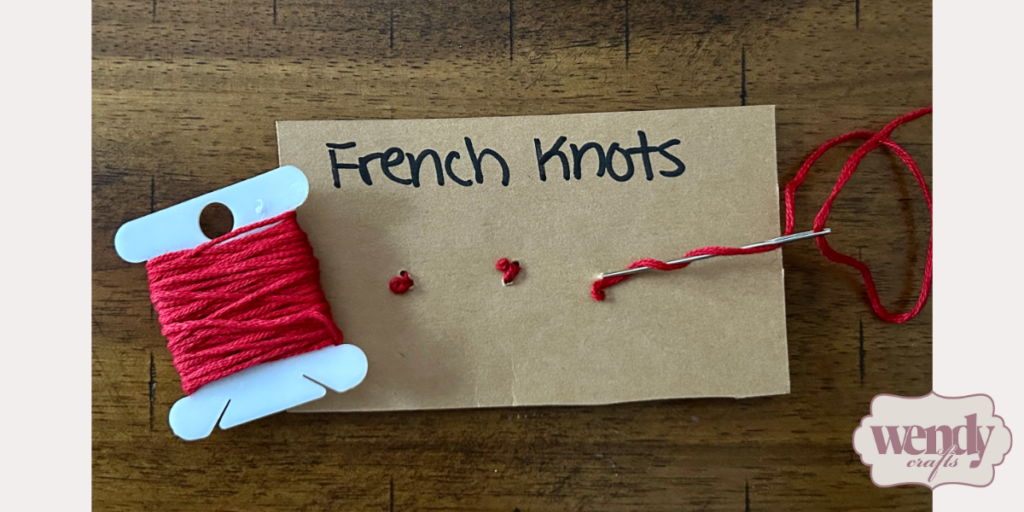
French Knots
These small, textured knots add dimension and interest to your embroidered cards. Don’t be intimidated by their exotic-sounding name—they’re easy to get the hang of!
- Bring the needle up through the card (point A).
- Wrap the floss around the needle twice, holding it tightly with your non-dominant hand.
- Insert the needle very close to where it emerged (point B).
- Pull the needle through while maintaining tension on the floss to create the knot.
Remember that practice makes perfect! It can take some time to get the stitch to look right. Before stitching on your card, it helps to practice your stitches on a scrap piece of fabric or card stock to get comfortable with the technique and achieve consistent results.
Embroidering Your Card
Now you’re ready to bring your design to life! Here are some tips to get the best results for your hand-embroidered card:
- Secure Your Thread: Start by knotting the end of your embroidery floss.
- Poke the Stitching Holes Ahead of Time: It helps to poke your stitching holes into your design before bringing the thread into play. This will make it easier to thread instead of making the holes as you go.
- Working with Colors: If your design involves multiple colors, consider how you end and start new threads. Weave the ends through the back of your stitches to secure them and avoid loose ends.
- Consistent Tension: Maintain an even tension while stitching to avoid puckering or distorting the card. You’re aiming for a gentle, consistent pull on the thread.
- Tangles: If your thread gets tangled, gently untangle it with your fingers or a needle.
- Size and Spacing: Try to keep your stitches the same size and spacing, but don’t be afraid to remove and redo them if necessary!

Finishing Touches for Your Embroidered Cards
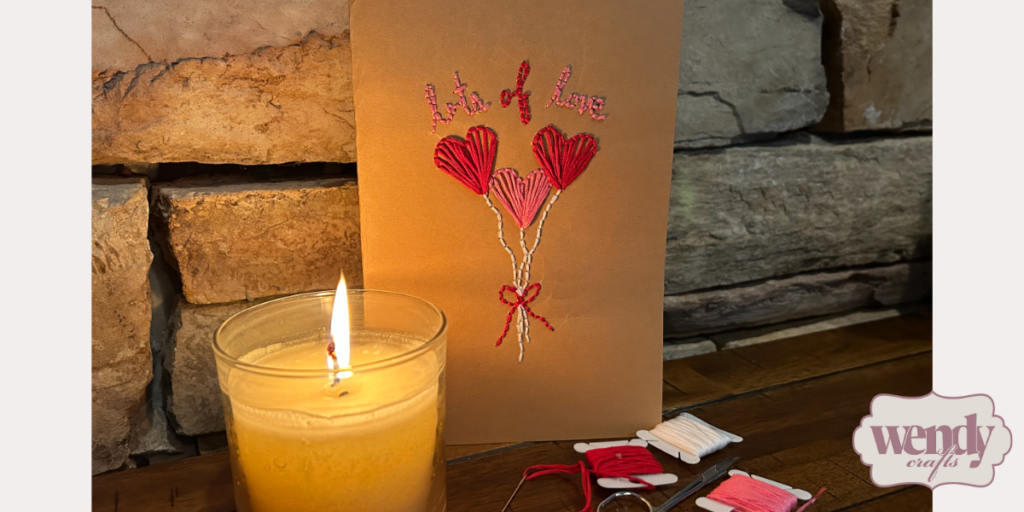
Once you’ve completed the embroidery, it’s time to add those special finishing touches. Think pretty embellishments, maybe a fancy frame, and don’t forget a heartfelt message inside. These will make your card extra special!
- Embellishments: Add beads, sequins, ribbons, or other decorative elements to enhance your design. Sew them securely with a needle and thread, or use a strong adhesive.
- Framing or Mounting: For a more polished and professional look, you can frame your embroidered card or mount it on a larger piece of card stock. Choose a frame or mat that complements your design and color scheme.
- Heartfelt Message: Don’t forget the most important part of your card—writing a thoughtful message inside.
Ready to Create Your Own Embroidered Cards?
Get ready for a seriously fun and rewarding crafting adventure! Making embroidered cards is the perfect way to unleash your creativity and create one-of-a-kind gifts that will be treasured forever.
Don’t be afraid to experiment and have fun with card embroidery! The time and care you put into each stitch will shine through, making your cards truly special keepsakes.
Looking for more ideas? Check out my other blog posts for more handmade crafting inspiration!